I attended my first DockerCon last week, here are my final thoughts;
Docker is here to stay! Which is a good thing, but I can see the passion in all of their employees, and they are going to continue to evolve their product line to provide the software development and operations world great tools.
My goals for the conference were to see not only how I can apply this to my everyday life at work, but how I can apply this technology in my open source projects as well. Hopefully I could meet some great resources along the way! Oh, and eat some Brisket, mmmmmmmm brisket!
Likes: This conference was super focused, nothing even the slightly bit not related to containers was mentioned. It was nice to not have any distractions. The staff conference and Docker were extremely nice and helpful! I liked that the vendor expo had extended hours, many times I go to a conference and I am forced to choose between attending sessions or talking with vendors at the expo, I didn’t have to do that at Dockercon, plenty of time for both.
Dislikes: The workshop I signed up for was horrible, we spent the first 30 minutes doing hands on work, and the other 2.5 hours listening to two guys read their slides, it was not very helpful. Overall, I wish there would have been more Windows content, I know its new, but it was lacking. In general I feel like there could have been more sessions. It appeared that all of the “here’s how we did it” sessions were from big huge companies, nothing in the SMB range to compare myself to. My last criticism is that the community theaters were horrible to attend, people were pushing and shoving to get closer, because it was very very difficult to hear. I liked the concept, but the delivery just didn’t work out.
Takeaways:
I’m very interested to learn more and test drive VMware’s VIC (vSphere Integrated Containers). Due to the fact that I work with VMware products a lot, it seems like a logical decision. I also like that they are providing a complete solution here, with Harbor, Admiral and the Photon Platform (minus Windows).
Windows has a long way to go. It works, but its not ready for prime time. The images are too large, and the application pool is too low for it to be a versatile and enterprise solution. It may be useful if someone is already running Hyper-V as their hypervisor, but I assume this is not the case for most.
Less is more! I learned quite a bit, however the message that never changed was to continue to reduce the size of the container images! Abby Fuller had a great session on this that kept playing over in my head.
YOU ARE NOT ALONE!
What now?
I already updated my Windows images to conserve space. I saved about 1gb on my PowerTools image, and several mb on my Nano Image by following some simple tricks learned in the Abby Fuller session. Check it out on Docker Hub.
Soon Windows will allow you to run Linux and Windows containers at the same time from the same host OS, this is exciting. This will allow me to create a small application on a single host, without having to use a Windows application stack, but use my powershell containers for processing the work.
I also learned how the layers of the Images worked, and that I should avoid leaving files on the layers to conserve space. This forced me to upload some of my modules to the Powershell Gallery to provide easy installation, and a smaller footprint. So that’s kinda cool!
I need to get to it, and start developing a plan to migrate from vm’s to containers!
Last, but not least:
I was worried that I was very behind the curve on Docker, but in talking with quite a few of attendees, it appears we are all in the same boat. There is plenty of help out there and many folks that are in your same situation. Join the community, join the slack channels, and start asking questions. It’s a very helpful and welcoming community, which is very refreshing! Give Docker a test drive and see how it can help your organization run faster and leaner. I encourage everyone to throw a bathing suit on and go ride a whale!
I’ve updated my Windows Docker image to include PowerNSX, PowervRA, and Vester. Why? just because. I’m sure there are folks out there who may want to run and explore with Docker for Windows and Windows containers. So why not use a container that you can apply to your daily tasks as a VMware admin?
You can check out my previous blogs on Docker and PowerCLI to understand how to get your environment setup.
The really cool thing about the Docker container is that you are guaranteed a clean consistent environment each time. And its quick! (Well after the initial download of the container).
Here is the list of available modules in my new Docker Image:
Hi everyone! This idea really stemmed from the VMworld Hackathon Vegas 2016. Yes, it really took me this much time to get this thing put together. I think that the project was initially intended to be used with Pester and NSX. This new project is a user interface that wraps Vester. The hope is that it will expand to other Powershell unit/integration tests, or configuration management tools. I’d love to start playing with PowerNSX and Vester!! The great part about this tool is that you can share a single interface with a team or group of system administrators, not everyone will need to install and run command line tests. I work on a team of 11 folks with varying levels of skills, this tool allows us to share a single interface to inspect our entire vSphere infrastructure, remediate configuration drifts, report on problems, and compare historical data easily.
Right now the project is completely separate project than Vester. Somewhere in the future we will need to determine what the right model will be and whether or not to start integrating the two code bases. At this time there are no code changes needed in order to run XesterUI on top of Vester.
Side note, I do not claim to be a web developer. I have chosen the WAMP stack because it is very easy for a System Administrator to manage, update, and customize. This tool is intended to be functional first, pretty second. I will take any help I can get with making the pages prettier, but I will not sacrifice looks for the ability of a junior or mid level SA to make changes that could help their organization.
Lastly, this is a Beta release. I’m interested to get feedback on whether this will be useful, or improvements and feature requests, nothing is off the table at this point!
Components/Nomenclature
TestRun – A set of specified tests that run on specific Targets.
System – A group of Targets, must contain at least one vCenter
Target – A single vSphere entity, vCenter, Host, Cluster, vm, etc.
Queue Manager – Manages the Queue of tests, assigns them to an appropriate TestRun Manager, also aborts cancelled testruns.
TestRun Manager – A process that can execute a TestRun workflow.
Workflow – A wrapper script for Vester.
Database – Collects all of the meta data about the vSphere systems and TestRun results.
User Interface – Set of web pages where you are able to slice and dice the TestRun data, submit TestRuns, Remediate, etc.
How does it work?
XesterUI simply wraps Vester right now. There is a workflow script that is executed by the TestRun Manager. The wrapper script gets test information from the Database, executes Vester specifying the config.json file and whether or not to remediate problems. After the test completes the script parses the XML result file, and imports the TestRun data as records in the Database. Once the data is imported, the user is free to view, sort, and filter the TestRun data.
Setup/Deployment:
Setup is not difficult, I’m still working on a deployment script (and better documentation) that will make things fairly simple, until then follow these quick directions (and let me know if you have any problems):
Download and install:
WampServer 2.5 or newer
PowerWamp project (place in c:\openprojects\PowerWamp)
PowerLumber project (place in c:\openprojects\PowerLumber)
XesterUI project (place in c:\openprojects\XesterUI)
Note: The deployment of Components does not have to all be on the same machine. You can deploy the Queue Manager and TestRun Managers to different machines. Not sure the Queue Manager makes sense at this point. Additionally you can install the ‘AMP’ on a linux host, so long as it will have access to a CIFS share where the log files are accessible to all parties. Setting up multiple TestRun Managers could prove to be very useful if you have multiple sites and low WAN speeds.
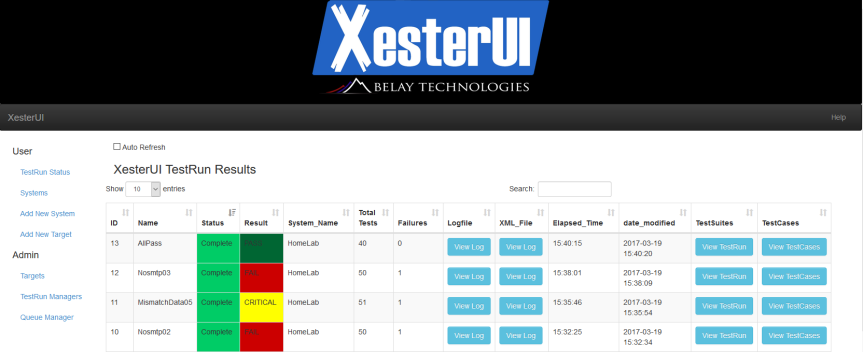
Status and Results:
Here is a list of the status and results included in the Sample Data. I Highly recommend you use the default ID’s and Text Status/Result. Feel free to change the HTML color though!
The result of an overall TestRun will bubble up from the lowest test case.
A critical result means that the Total number of testcases reported in the XML, did not get inserted into the database.
Pass means that ALL testcases passed, and are accounted for.
Fail indicates that at least 1 test case has failed.
Agent_Error indicates that the system failed somewhere.
From this page you have several options, You can view the TestRun logfile, or Result XML.
All of the TestRun worflow messages will be logged here.
This is the XML produces from Vester/Pester.
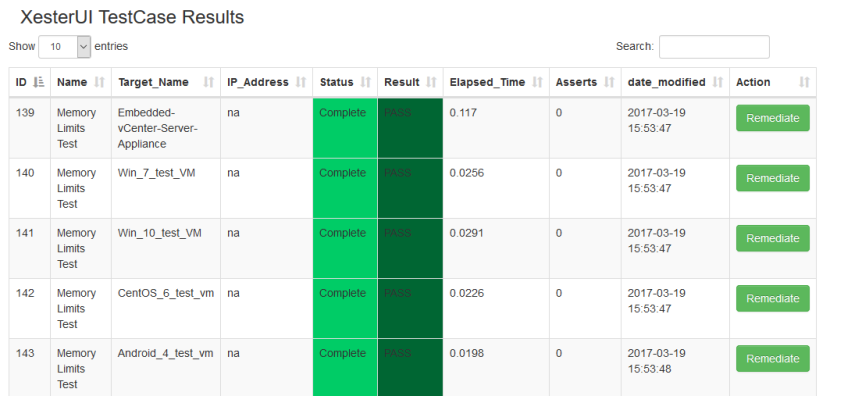
There are two options for viewing Testcase results for a specific TestRun. Drilling down by TestSuite, or viewing all Testcases.
Viewing all TestSuites of a TestRun. Failures bubble up.
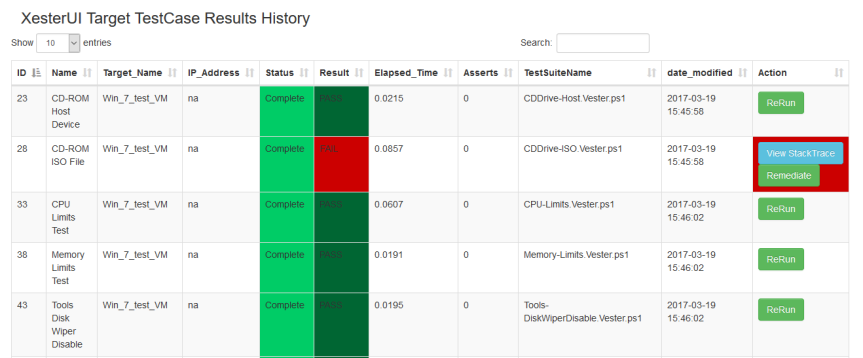
Viewing all TestCases from a TestRun, sortable, filterable data.
From the TestSuite page, you are able to drill down and view the Testcases:
Lowest level drill down, all test cases for a specific TestSuite in an overall TestRun.
On most of the UI pages you are able to sort any column and filter on strings. If a test case has failed, you are able to view the stack trace, and are able to resubmit the test with the remediate flag.
Stacktrace message from a testcase failure.
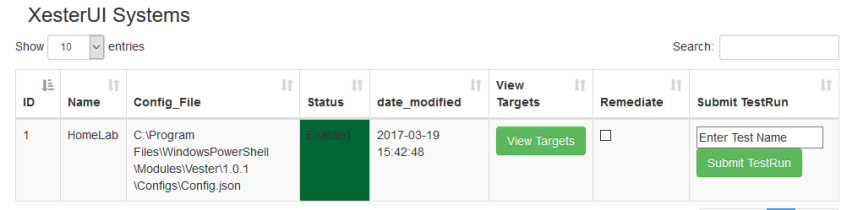
Submitting a new TestRun is easy, Click the Systems link, and in the row of the system you’d like to test, enter a TestRun name, specify if you want to remediate, and click ‘Submit TestRun’.
PHP requires and escape character in Windows paths!
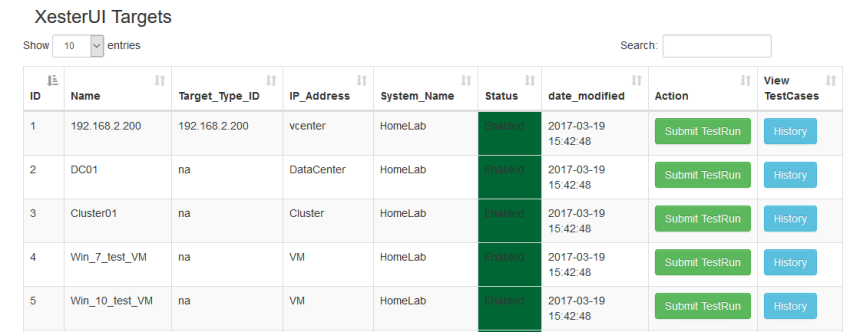
You are also able to view the targets from a specified system or all systems.
View targets from one or all Systems.
Additionally, if you click on a target you have the option to view all previous TestRuns and the results.
Compare all testcases for a specified target.
Creating a new System and Target are easy, simply fill out the supplied forms.
Only basic information can be entered for a new Target. I’ll work on making this more robust.
Systems are straight forward to add.
Lastly, you can view the Queue Manager and TestRun manager log files from their respective pages. Additionally you can shutdown the Managers. There is a ticket in to be able to start those components. The log files for TestRuns and the manager are stored in ‘c:\XesterUI\component‘ (Queue_Manager, TestRun_Manager, TestRuns\TestName_ID).
View status, logs, and shutdown the Queue Manager
View status, logs, and shutdown the TestRun Manager
Hopefully this gives you an overview of all the features of this tool, and how it can be useful to have all of that data in a searchable/sortable format. Note that Targets do not need to be populated into the DB before you run your first test (with exception of a vCenter). If a target does not exist, it will be created when the XML is being converted and results inserted into the DB.
Upcoming Features:
Build config files on the fly for an individual ‘target’ or groups of ‘targets’.
Mulitple vCenter’s per system.
Ability to create a config.json file by clicking through the web.
Creating a useful exportable report (potentially email reporting).
Ability to abort a test.
vCenter config.json files are more appropriate than ‘System’ config files.
Currently a problem with the SMTP check not returning a vCenter ‘Target’ in the XML. This causes a problem with inserting the data into the DB. I know the Target is a vCenter, but I am not given the Target name. I’ll work on tracking down why that’s missing.
Security:
I’m not a security expert. So taking a look at WAMP best practices might be prudent in your environment. I can certainly give you advice, but do your due diligence and make sure you are meeting your organizations goals for security. There are several area’s of this product that could present a security risk. Keep in mind this project is currently in beta, and will continue to grow in maturity over time. Let me know if you have any questions or concerns.
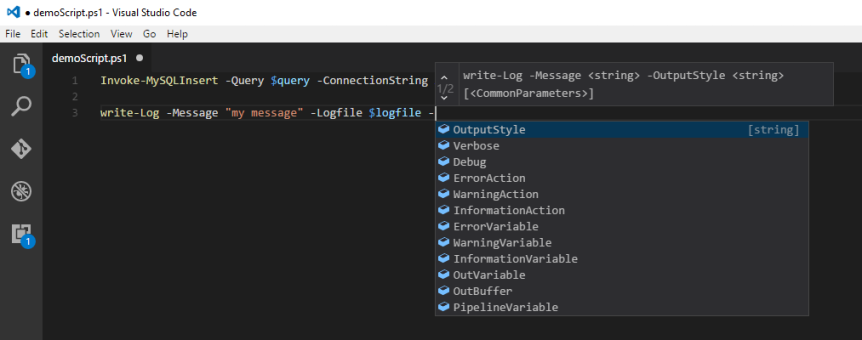
I absolutely fell in love with using Microsoft’s VScode for writing Powershell Scripts. One of the best features is the ability to import custom modules into the Intellisense feature.
It can be a simple or complicated script. Luc does a great job with his script to capture all kinds of options for PowerCLI on his blog. But what about other modules you might want to use?
Simply add them to the script located here (you might need to create it first):
That’s it, 7 lines and I have import a ton of functions that will help me speed up the rate at which I can write custom code/scripts. With the newer versions of VScode it is not necessary to update your preferences to load a powershell profile. It just loads it by default now. Oh, of course this does require the powershell plugin!
Once you create your Profile script to import your specified modules, simply reload VScode. Open a Powershell file, and witness the magic. See below, the ‘Invoke-MySQLInsert’ is a function from one of my imported modules PowerWamp.
And this shows my other custom module PowerLumber:
Think about how much time ‘tab’ completion saves you in the console, and its available in VScode!
To show you the Awesomeness of PowerCLI + Windows + Docker, I’m going to walk through the setup of Installing Docker on Windows, Pulling an Image, running the container, performing a task against a VMware infrastructure and interacting with a MySQL database.
I mentioned in my last post, that the reason I need a Windows container for PowerCLI vs. the Linux, is due to some .net assemblies missing for a module I use to work with MySQL.
To get started I created a Brand new Base Windows 10 Pro x64 vm in VMware Workstation. Be sure to enable nested virtualization on the VM (VTX). I also gave it 40gb storage and 8gb of memory.
Quick Reference for Software versions I used for this demo:
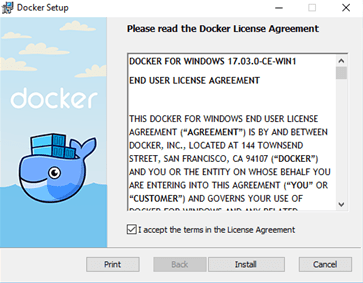
Double click the .msi, select the ‘I accept’, click install
Wait for about 30 seconds, and it finishes! Super quick. Go ahead and check the launch Docker box, and select finish.
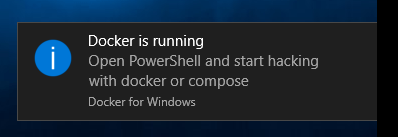
You’ll see in the notification area that Docker will try to start.
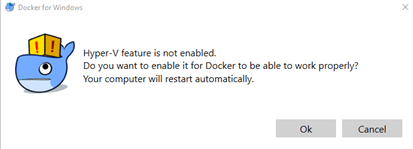
But it will fail! Oh No! (It’s okay, we expected that since we did not enable Hyper-V)
Select ‘Ok’ to allow Docker to enable Hyper-V. It will also restart your Windows Operating system in order to properly enable the Windows feature. Thank goodness for SSD’s!
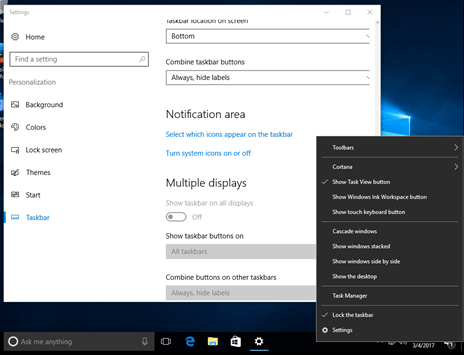
One thing I like to do on my Windows operating systems is to show my Notification Icons on the task bar. Right-click on the task bar and select settings. Scroll down and select ‘Select which icons appear on the taskbar’ (Windows must be activated) <—– Not sure why?????
Then just swipe the ones you want or don’t want.
After the reboot, Go back to the notification area and right click on the Docker Whale (not that you have any other whales down there). Then select ‘Switch to Windows Containers…’
It will ask you to select ok, and Reboot to enable Windows Containers.
BOOM, It’s running, we’re ready!!
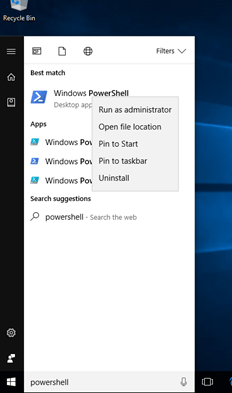
I also like to pin Powershell to the taskbar. Click the Windows button, type ‘powershell’ Right click, and select ‘Pin to taskbar’
Here are some reference links to the items we will go over
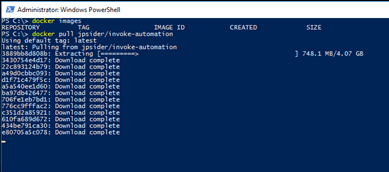
It may take some time to download, windows containers are much larger than the Linux ones. This will pull my custom Image that include : Powercli 6.5, PowerWamp, and PowerLumber on Windows Server Core
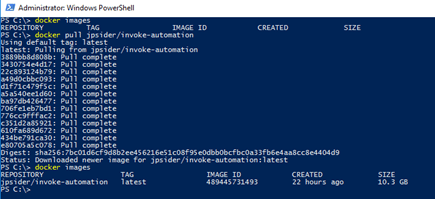
After it completes, run:
docker images
Now you should see the new jpsider/invoke-automation image!
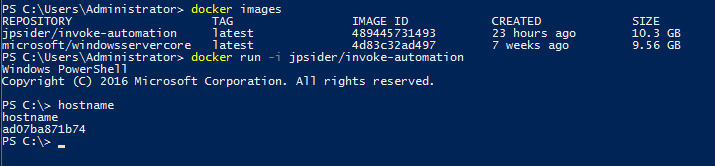
Now let’s run the Container, type:
docker run –i jpsider/invoke-automation
It will open a console in your active console window. Type hostname, and hit enter (it should return the name of the container.
Now run these 2 commands:
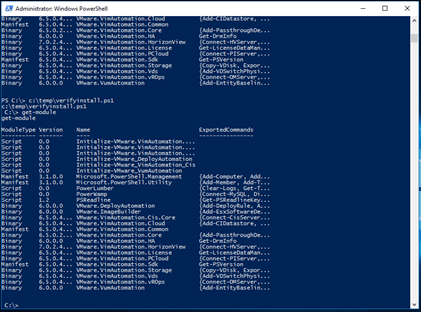
cat c:\temp\modules.log
c:\temp\verifyInstall.ps1
which will return the installed modules ran during creation of the image, then import them into the active console. Now type :
get-module
SWEET! Now we have a running container with our desired modules, lets get a new script to run! Use these commands to copy my file down, or any file you want.
This script will do a few things to prove modules are imported and everything is working as expected…
Create and write a log file
Connect to an esx server.
Print out the Modules to console and log file.
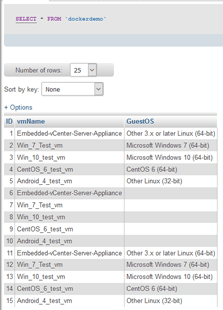
Print out the vm’s to console and log file.
Query a remote DB for some info & print it out.
Insert the VM data into the db
Simply run the script:
C:\temp\demoScript.ps1
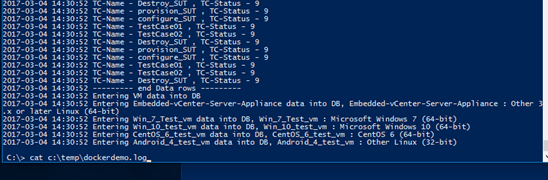
You’ll be able to see the VM information in the DB, and you can cat the log file.
cat c:\temp\dockerDemo.log
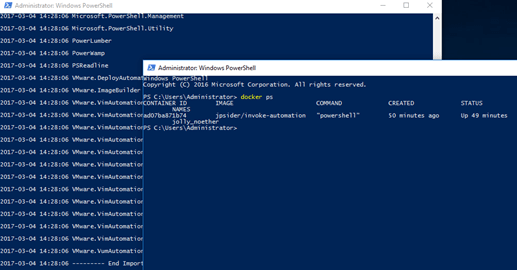
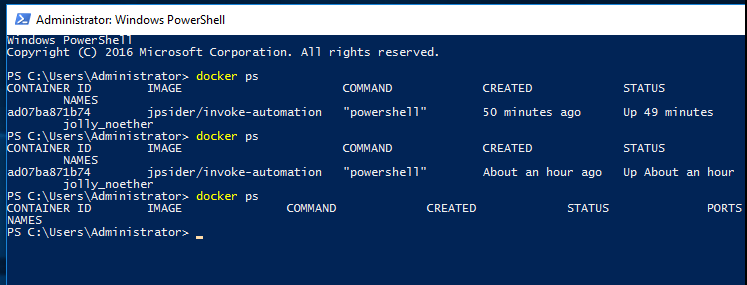
On your Docker Host, you can open a second powershell window and run:
docker ps
That’s it, head back to the container console window and type exit to kill the container.
In that second window run:
docker ps
Which will show its all gone now!
Hopefully you found this useful, I will have some follow up posts that go into more detail on how I am planning to use all of this together to manage Infrastructure systems.
WOW! Needless to say I was not super optimistic when I started the Docker discovery project. Man was I wrong, I am super impressed with the latest release and will continue to explore all the potential uses for Windows Containers. It was probably about 1.5 to 2 years ago that I had first heard of it. Generally speaking I do most of my work with Windows, so it was essential that I could run the engine on Windows. So when I first gave it a shot, I started reading the documentation and it said I had to load VirtualBox, install Ubuntu, etc. NOT A WINDOWS solution at all. It was laughable! I mean, just say its Docker in a box that you can run in a Windows machine.
Anyway, No big deal. I was fine with waiting. I’m glad I never gave up. The past few hours has been well worth it, and with some of my upcoming projects the discovery project I started is going pay off big time. Another huge piece to the equation was that Microsoft finally supported Hyper-V in a nested environment, and finally the native support for the Docker container Engine.
So a quick rundown of my current test environment…. I’m running a MacBook Pro, with VMware Fusion installed (Thank you @VMworld 2016 for the key!). Inside of fusion I have a Windows 10 x64 vm, where all the Docker Magic happens.
I first started with what I would consider the normal scenario, someone wanting to run a Linux Container… So I enabled Hyper-V, don’t forget to edit the Base vm to enable VTX or you will get errors. Oh, and make sure your vm has enough physical requirements, that bit me in the ass a few times as I continued to redeploy. I followed the steps found here to get Linux Containers to run on Windows. It was simple and flawless. I can think of so many applications where these containers could be useful in my daily job.
Ok, on to what I’ve been excited for, Windows Containers on Windows. Sadly this is all about Windows 10, I don’t have licensing for Server 2016, and its not worth me wasting my time on a trial when Windows 10 works perfectly fine. So my first mistake was mixing up the page linked up above (which I used to install Docker) and this page for running Windows containers. I kept looking for a toggle switch for the Docker engine to switch from Linux to Windows, I thought I was crazy. RTFM! and when you are done… RTFM again! When I was trying to run the Windows containers, it was only available in the Beta, and I didn’t install the Beta, I had installed the latest stable release. That was a simple problem to fix….
The link above is probably a bit more complicated than it needs to be for installing, Now you can download the latest software from Docker. Enable the Hyper-V feature, ensure the the Windows Machine has VTX or virtualization technology enabled, then install Docker, the software installer does all the work for you.
Then the real fun begins, at first, I admit, I didn’t get it. What’s the benefit? Why am I doing this? Why doesn’t it work? What did I do wrong? Am I wasting my time? What else could I be doing? Golf?
So if you have Docker installed, and have toggled over to the Windows on Windows engine. I recommend you start on this page, at the ‘Running Windows Containers’ section. And stop at ‘Using docker-compose on Windows’. I never ran through the Music store or IIS type demo’s. My primary function is just using them for PowerShell applications.
So after doing the ‘Hello World’ piece I needed a break, so I took a couple weeks off. I’m not sure if that was a good or a bad thing, because it took me a few minutes to get my mind back into the idea of what Docker could do for me and how I get it to work. I found a page on Microsoft’s website that outlined how to create a Dockerfile. This was the single greatest link I found it really laid out the concept of how this file can build an image. And how I can tailor the Container for my needs. Once I read this page, I was ready to go, and quickly started playing with building images. Did it go smoothly? NO. It was a lot of trial and error to get the commands I wanted to run, work properly. Nothing too crazy, just tedious at first. I also started with WindowsServerCore, vs. Nano, so that I was working with a ‘full’ OS.
That’s it, of course I have more plans, but If I could get these pieces working, I am in business! Problem #1, VMware does not like you to download PowerCLI from the Internet without logging into their website, so I had to load those files on the host. I chose 6.5, because they are just modules, no true install required. Hooray! Ok, I know the VMware guys are wondering why I am not using the PowerCLI Docker Image. I currently only have one reason, the Powershell/.net MySQL plugin, I need it, and it won’t work on Powershell for Linux (to my knowledge or Nano, see below).
# Invoke-Automation Windows Dockerfile

# Indicates that the windowsservercore image will be used as the base image.
FROM microsoft/windowsservercore

# Metadata indicating an image maintainer.
MAINTAINER @jpsider

# Copy install files to the container
COPY mysql-connector.msi c:/temp/
COPY powercli.exe c:/temp/

# Install PowerCLI
RUN powershell Start-Process c:\temp\powercli.exe -ArgumentList '/s /qn /w /V"/qr"' -Wait

# Move PowerCLI Modules to correct Directory
RUN powershell Move-Item -Path 'C:\Program Files (x86)\VMware\Infrastructure\PowerCLI\Modules\*' -Destination 'C:\Program Files\WindowsPowerShell\Modules'

# Install MySql connector
RUN powershell Start-Process c:\temp\mysql-connector.msi -ArgumentList '/quiet /passive' -Wait

# Copy PowerWamp Module to container
ADD https://raw.github.com/jpsider/PowerWamp/master/powerWamp.psm1 c:/temp/

# Copy PowerLumber Module to container
ADD https://raw.github.com/jpsider/PowerLumber/master/PowerLumber.psm1 c:/temp/

# Add powershell script
COPY verifyInstall.ps1 c:/temp/

# Validate Imported Modules
RUN powershell -executionpolicy bypass c:\temp\verifyInstall.ps1

# Sets a command or process that will run each time a container is run from the new image.
CMD [ "powershell" ]
Once you have Docker installed, you can pull my image:
docker pull jpsider/invoke-automation
# then run the Container
docker run -it jpsider/invoke-automation
#run this file to import the modules to the console
c:\temp\verifyInstall.ps1
This will import the modules mentioned above into the current console and print a list of active modules into a log file in the c:\temp directory.
As I continue to pull all of these technologies together I will have more posts, But I really enjoyed the discovery project with Docker, lots of fun and a really cool technology.
I’m interested in hearing whether you could use this ServerCore Image, or any other feedback you might have.
I’ve started a PowerShell Module to standardize my logging across all of my projects. I kept using the same code over and over, so this will be a great time saver when I start up a new project or script. Right now I’ve kept it pretty basic, but I’d like to add more advanced functions around rolling logs by day/hour/user specified time. If you have any other requests drop me a message or add an issue.
The write-log function gives you the ability to write to just the console, just a log file or both, which can be extremely useful, even when developing/testing a script in the console. Quickly being able to specify whether something gets spit out to the console or not by adding a parameter has been much easier than switching my code from write-host to write-output all the time.
Here is a quick script to capture some vm information and log it (Ideally in the future I will have a post using PowerWamp, where I input the information into a Database).
My first post about the homelab was all glitter and good news. Read about it here. This one will touch on a couple of things that happened during the development of customized scripts for my homelab.
First, I made the ultimate mistake, multiple changes at once. When I first bought all my homelab components I quickly put them together, and ran the script from #TeamAlam . It worked great, and I was able to do my release testing for SummitRTS. However I knew that I wanted to do more with the deployment scripts. Enough already, whats the problem?
Problem #1
Inconsistent Services
Historically in my house I have always ran my own network and WIFI independent of my service providers, this way I don’t have to continue to change network settings, passwords etc on all of the connected devices if I switch companies. Over the past year I have decided to reduce the amount of WIFI devices and run Cat5/cat6 through the house. Which is great, however, it can be a pain when you have two networks. So after some time listening to my wife complain that we could not print from our WIFI devices (because it was on a separate network) I decided to flatten all the networks and remove my personal gear.
I know what your thinking, why not just move the printer to the same network or create a route between the two networks…? That would have been too easy! Actually based on the location of the printer it would have been a pain in the butt. So I did it, I flattened my network, all my devices including my home lab were on the same network, the dreaded service providers network. I logged into my Comcast Xfinity router and edited DHCP to give me a range where I can setup my own DHCP or have some static address space. So far so good. The wife can print, all of my physical and WIFI devices are reconnected. Total time 30 minutes. Hooray!
Notice I said physical and WIFI devices, I have not mentioned my virtual devices. So obviously my vCenter would no longer connect, I could have done the easy thing and just changed the IP address on the VCSA. However, I knew that I wanted to work on the deployment scripts, and off I went…. I changed a few things, opened up Powercli and started the deployment script, and I walked away…. But to my surprise I came back to an error. I forget what it was, and I didn’t spend much time really thinking too much about it. I ran the destroy script again, rebooted the ESX host, and started the deployment script. Same error… So I decided to google around a bit and quickly determined that the VCSA couldn’t start because of a DNS related issue. WHAT?!?!?!?! the script uses and IP not a DNS name, I triple checked that! Honestly the script didn’t change much from when it had worked a month ago.
Resolution #1
Bottom line here is that I learned two things, Comcast Xfinity does not natively support Forward and Reverse DNS. Actually you cannot even add DNS records to their home routers as of the date of this writing (Unless someone can enlighten me). The other thing is that VCSA requires Forward and Reverse DNS to be functioning on the network, otherwise the VM will deploy, but the services won’t start. I could probably fake out the vm with a hosts file entry, but I really don’t feel like doing that every deployment, my goal is to deploy as quickly and easily as possible with no human interaction. I’ve redeployed it 4 times tonight…. So my solution for now is to isolate my equipment off the Comcast network using an older NetGear R600 router I have which can fully support Forward and Reverse DNS.
Problem #2
All sessions are not the same
I’m naive. I usually have 2 console windows open at all time. 1 for manually testing one liners for small scripts, the 2nd is for running fully automated scripts. With all of the things I was focused on my sessions were not one of them. This error popped up in my automated script running console :
So being that naive person I am, I thought I blew up my ESXi NUC. No problem, I grabbed a second USB stick, loaded ESXi on it, and was quickly back at it. Ran the deployment script…. and I got the same error. HUH? When I google for this error it led me to believe that the SDK service had not started on the ESX host or was broke. The IP’s were good, the web services had no problems. At the time I was also testing my on liners for adding NFS storage in my Manual console, and that worked fine. I should note that upon manual inspection, the automated script did work, even though it was still throwing the SDK errors. Very odd, I didn’t test disconnecting the vi sessions and reconnecting in the same console window, but I would imagine that the Powercli Session was toast.
Resolution #2
Refresh your Console windows if you start to get strange errors! Oh, and run as Administrator!!!
Problem #3
Dead NFS connection
Whenever I am getting started to work on a project, I turn my power strips on, then power on all my devices. It would take ESXi 10-15 minutes to boot up. It would hang at the nfs4client, it would never fail, just take its sweet old time. It was never really a problem, I always took the time to open up my programs, check Twitter, Facebook, etc. I can always find a way to avoid work!
Resolution #3
Starting and waiting for my Synology to fully power on resolves this problem (which isn’t a long time). Once the Synology “beeps” I can power on ESXi and it quickly boots to the login screen. The time difference is amazing!
Summary
Keep at it! Some times it’s a simple fix. Oh and my deployment times keep getting faster! Also keep your changes to a minimum when testing new things. Save yourself the frustrations.
The beloved home lab project, it was a pipe dream for years. How could I justify buying new or used equipment to just play or tinker with. Finally, and I’m still not sure how, but I convinced my wife to invest in my desire to have some extra toys at the house. I think the biggest question I had to answer was: Why? Why do I need a home lab? To me the answer was simple, I can be more effective in my online communities and at work if I have a reasonable lab to tinker with at home. Spending 30 minutes or an hour each day proves to be extremely helpful in developing my skills.
At VMworld this year I participated in the #hackathon, I think that is where my interest really spiked in learning more about the Intel NUC’s. I remember them being a solid platform for a small, robust lab.
So thanks to a shopping list from William Lam and some licensing from the vExpert program, I marched forward!
In addition to the Shopping list linked above, I went ahead and purchased a Synology DS216+II. I wanted a storage device that can be on my network, and use CIFS and NFS. You can opt for a more feature rich option, but this one will suit my needs. I added two 3TB Western Digital Hard drives.
William Lam is correct when he says that everything goes together smoothly, I ran into ZERO problems with the Hardware configuration of my new Intel NUC components. Which is part of the reason I love this setup so much. Not to mention its more powerful and easy to use than my company provided lab. When it all said an done, here is what my “rig” looks like now:
And, no the wife does not approve of my TV on my desk. 😛
Strangely I have never deployed ESX via a USB stick, so I relied on the community for that, These directions worked just fine for me Install ESXi 6 to USB via VMware Workstation
Now it was time for the rest of the deployment, with my requirements fairly simple, I wanted a lab with:
ESX
vCenter
VSAN
several Template vm’s (Windows and Linux)
NFS Storage
Licensed components
One liner Deployment
One liner Teardown/Destruction
Team “Alam” strikes again! PowerCLI Guru Alan Renouf and William Lam seemingly have a solution for anything automation when it comes to VMware. I used the links above to download scripts that can be used to deploy ESX, vCenter, VSAN to the Intel NUC platform.
The only piece I really needed to add was my licenses, NFS storage and Template vm’s. Additionally I updated the Destroy script to remove my vm’s and NFS storage. The scripts I use to deploy my new HomeLab test environment are located are located here on Github: HomeLab Scripts. I focused on trying to make the script more modular to meet my needs, and use common compoenents between the deployment and destruction stages.
I Highly recommend this setup for home labs. It is quick and easy to deploy, tear down and re-deploy. My current setup takes roughly 21 minutes to deploy.
VMware’s PowerCLI is probably the most used tool on any of my computers outside of a web browser. They are continuing to improve upon the product that basically saved powershells life (my personal opinion). With that said, I am constantly building little functions, modules, scripts to perform simple tasks.
I’ll be leaving as much of my work on my personal GitHub workspace. Feel free to check it out.
So, Get-ConsoleURL what is it? As you would imagine, its a simple function that returns the URL of a VM’s web console. Why is this important? Well wouldn’t it be nice to quickly share this with a co-worker? Or save this URL in a custom app/webpage you have? The Open-VMConsoleWindow function is very useful in a local machine, but it requires Powercli and opens a local copy of the vmrc. This function I have created will give you a shareable link to the vCenter and reference the vm via the MoRef.

 Hopefully you can find this image useful in your environment. And let me know if I missed any Community modules you would like or that I missed.