Update-ConsoleTitle -Title “Why did I wait so long?”

Not sure about you, but I am constantly trying to keep track of multiple PowerShell console windows that I have open. I tend to try and update the title of the console by using the following line:

$Host.UI.RawUI.WindowTitle = "Some Fancy Title"

However, trying to remember that is a pain in the butt. So I have created a function and added it to a new Module on the PowerShell Gallery. Why did I wait so long to make a function for this?!?!


Install-Module -Name "jpsider"

Update-ConsoleTitle -Title "Some Fancy Title"

This function name is so much easier to remember. Hopefully, you will find it useful.

FancyTitle

I plan on adding more helpful functions to this module over time.

PowerShell Scaffolding – How I build modules.

Recently I’ve been getting quite a few inquiries about setting up modules for PowerShell. So, I’ve decided to write about it. Below you will read about how I go about creating a new PowerShell module.

Included in this Post:

  • Overview of Scaffolding
    • Plaster
  • My Module Template
    • Local testing files
  • AsBuiltReport
    • Run through an example

What is Scaffolding?

In it’s simplist form, its a common directory and file structure to help you build a PowerShell module. The directory structure helps separate build tools from the actual module/function files. There are two fairly popular scaffolding tools for PowerShell:

Plaster is the tool that I use to create new module scaffolding. I have found it easy to use and when I was first writing modules, there were quite a few blogs that did really well at helping me understand the process and tools. This was probably the most helpful link that I could find using Plaster. -> Kevin Marquette

My Module Template

Of course nothing in the PowerShell world is complete unless you have put your own twist or spin on it! Over time I have created my own Plaster template that I use to generate my own Modules. While the changes are small, it helps me rapidly generate all of the directories I desire to have in a module. My Module template can be found on GitHub.

My additions to the standard Plaster template are the following:

  • BuildSettings.ps1
    • Separate file to add any additional build settings. It keeps things clean IMO.
  • tests\RunPester.ps1
    • Allows developer to run Pester Tests on the full module on local box.
  • tests\RunPSScriptAnalyzer.ps1
  • tests\RunPSCodeHealth.ps1
    • Allows developer to run PSCodeHealth on the full module on local box.
  • Example Function and Unit test files
    • Disable-SSLValidation.ps1
      • Example Function (Located in Public and Private folders)
    • Disable-SSLValidation.Tests.ps1
      • Example Unit test file (Located in Public and Private folders)

AsBuiltReport

I’ve been talking with the guys who are working on the core functionality of the AsBuiltReport PowerShell Modules. They’ve asked me to scaffold out two of their repositories to help create an automated build pipeline for their modules. So lets walk through the process to show you how simple it can be.

  1. Install the Plaster Module
  2. Download my Plaster FullModule Template
  3. Run Plaster!

Step 1 – Is fairly easy, open a PowerShell console and run:


Install-Module Plaster<br data-mce-bogus="1">


Step 2 – Visit the link above and either Fork or clone the repository to your local machine.

Step 3 – Run Plaster, update the paths to match your local directories:


Invoke-Plaster -TemplatePath C:\OPEN_PROJECTS\Invoke-Automation\Powershell\Plaster\FullModuleTemplate\ -DestinationPath .\AsBuiltReport\


Then follow the prompts to create your new Module… It’s that simple!


==================================================
Name of your module (AsBuiltReport): AsBuiltReport.Cohesity.DataPlatform
Brief description on this module: AsBuiltReport.Cohesity.DataPlatform
Github repo name for this module (AsBuiltReport.Cohesity.DataPlatform):
GitHub username (AsBuiltReport):
Module author's' name (AsBuiltReport):
Initial module version (0.0.1):
Destination path: C:\temp\PLASTERSHIT\AsBuiltReport\
Creating folder structure
Create docs\images\
Create tests\
Create spec\
Create .vscode\
Create AsBuiltReport.Cohesity.DataPlatform\public\
Create AsBuiltReport.Cohesity.DataPlatform\private\
Create AsBuiltReport.Cohesity.DataPlatform\classes\
Create AsBuiltReport.Cohesity.DataPlatform\data\
Create tests\public\
Create tests\private\
Deploying files
Create appveyor.yml
Create build.ps1
Create BuildSettings.ps1
Create deploy.PSDeploy.ps1
Create .gitignore
Create .vscode\settings.json
Create spec\module.Steps.ps1
Create mkdocs.yml
Create PITCHME.md
Create readme.md
Create LICENSE
Create module.build.ps1
Create AsBuiltReport.Cohesity.DataPlatform\public\Disable-SSLValidation.ps1
Create AsBuiltReport.Cohesity.DataPlatform\private\Disable-SSLValidation.ps1
Create docs\about.md
Create docs\acknowledgements.md
Create docs\index.md
Create docs\Quick-Start-Installation-and-Example.md
Create tests\Project.Tests.ps1
Create tests\Help.Tests.ps1
Create tests\Feature.Tests.ps1
Create tests\Regression.Tests.ps1
Create tests\Unit.Tests.ps1
Create tests\RunPSCodeHealth.ps1
Create tests\RunPSScriptAnalyzer.ps1
Create tests\RunPester.ps1
Create tests\public\Disable-SSLValidation.Tests.ps1
Create tests\private\Disable-SSLValidation.Tests.ps1
Create spec\module.feature
Create AsBuiltReport.Cohesity.DataPlatform\AsBuiltReport.Cohesity.DataPlatform.psm1
Create AsBuiltReport.Cohesity.DataPlatform\AsBuiltReport.Cohesity.DataPlatform.psd1

This will create the entire directory structure as well as replace the new module name in all of the correct places withing each of the new/copied files. See the Repository used in this example on the AsBuiltReport GitHub.

Feel free to fork/update my Plaster template, I’m always interested to see what the community can come up with.


VMworld Hackathon 2019 – PowerCLI team

The annual VMworld Hackathon hosted by the VMwareCode team is one of my favorite events of the year. We get to hang out with community members, eat, drink and pound on keyboards in a competition where anything goes. I’ve participated in each of the last 4 events (US only), and for the first time I was on the winning team! Very exciting! Thank you to the VMwareCode team for continuing to support such a fun event for the community! It’s honestly less about competing and more about learning new things. One of the best parts is getting messages weeks later stating that I helped someone with some little keyboard trick.

hck

This year I put together a team and had a whole bunch of folks join to have some fun with the PowerCLI examples repository. The team was comprised of folks who had skills that ranged from novice to expert. Hopefully everyone learned a few things and could apply them to their normal jobs.

Huge thanks to all my team members. You guys were AWESOME & fun to work with!!

This Year’s Project:

The team would focus on creating an automated process around the PowerCLI Examples repository in GitHub. Some tasks would include:

  • Authoring a Build pipeline
  • Creating quality gates for deployment
  • Advanced Tasks
    • Resolve any current Lint Errors (There are Hundreds)
    • Implement auto-fix instructions during commits for common errors
    • Add Pester Tests for scripts

Why would this be a useful project?

The PowerCLI examples repository is simply a mess. A lot of folks have submitted useful scripts/examples/modules and other things to the repository but there is no consistency in the material. It’s unrealistic to think that one person or even a small group could provide the oversight needed on such a large repository to ensure that only quality/useful code was being published. Our Hackathon team focused on attempting to make this process a little more human friendly. Which would allow the repository owners to set up acceptance criteria and allow for the build process to determine if the code meets the requirements. Additionally it would be great for the consumer of the repository to have an easy method for downloading and using the PowerCLI examples.

What we decided on:

In talks with the team we adjusted the tasks for the night to focus on making the PowerCLI examples repository more user friendly from the Administrative and User side. This would include the following tasks for the night:

  • Create a new GitHub Repository to keep things clean
  • Only focus on the Scripts Directory
  • Convert all the Scripts to Functions
  • Package the Functions as a PowerShell Module
  • Scaffold a directory structure to support a PowerShell Module
  • Select a single Script, convert it to a function
    • Add Pester Tests for the Single script
  • Create CI/CD pipeline using AppVeyor
  • Publish new Module to the PowerShell Gallery
  • Review/Define quality gates
  • Run Linting tools against the newly created functions

What we accomplished:

The good news is that we were able to complete each of the tasks above, with only a few caveats.

  • All of the scripts were converted to functions and the Linting was run against them. However it would not make sense to blindly place all of these items in the Module.
    • The repository we worked from can be viewed on my GitHub page.
  • Only 1 function Get-MigrationsSet has unit tests, it would take some time to create the tests for all of the functions that were converted. See the first bullet.

How’s it work?

  1. The contributor 
    1. Forks the repository
    2. Creates a new Branch for their function
    3. Adds a Function file and appropriate test file
    4. Adds the appropriate Function and test code
      1. Can run tests locally 
    5. Commits code to their Branch and Fork
    6. Creates a Pull Request (PR) to the Master repository
  2. The Repository owner
    1. Reviews the Pull Request
      1. AppVeyor Results
      2. General code purpose
      3. Suggests any edits
    2. Approves or denies the PR
      1. If the PR is approved
        1. The Module is updated on the PowerShell Gallery
          1. Requires a string added to the Merge ‘!deploy’
  3. The Consumer
    1. Can Install the module from the PowerShell Gallery
      1. Install-Module PowerCLIExamples
    2. Can Update the module from the PowerShell Gallery
      1. Update-Module PowerCLIExamples

pipeline

What does the future hold?

Here are my suggestions for the ‘PowerCLI Examples Repository’ of the future….

  • Repository Ownership
    • It’s unclear the level of ownership that VMware should take for the repository and for the module(s). 
    • This comes down to legal responsibility and I cannot speak to what the outcome should or will be.
  • Modules
    • All of the current modules in the Module directory should be broken out into their own repositories. See first bullet.
    • All modules should still follow best practices outlined for the Module Quality gates that need to still be finalized
  • Scripts
    • All Scripts should be reviewed to determine if they are better suited as functions.
    • Scripts are okay, but are less user friendly as far as a Module goes.
    • Should still follow best practices outlined for the Module Quality gates that still need to be finalized
  • Functions
    • All functions should be reviewed to ensure they make sense. Are generally useful and not duplicated.
    • Should still follow best practices outlined for the Module Quality gates that still need to be finalized
  • Module Quality Gates
    • These need to be developed over time
      • Start small, Iterate often, Automate always
    • They will help every contributor write better code
    • Should not be overly complex for new contributors
      • Yes, there is still a learning curve

Raspberry Panthers

This year I have decided to spend more time at my children’s elementary school. I have volunteered to lead a STEAM club. Last year for career day I created a ‘Match Maker’ game using 2 Raspberry Pi’s and some PowerShell to demonstrate what I do each day at work. It was a hit! Several months later I’m still getting great feedback from the 10-minute demo.

Starting in the fall I will be partnering up with a teacher and work with the students to deploy indoor weather stations to each classroom(pending funding). But, I need your help!

The school board will not let the club use the existing network infrastructure for the club. All of the equipment for this club will need to be purchased and operated in a standalone type of environment. The club will need to purchase the Raspberry Pi devices, sensors, cables, laptops, keyboards, monitors, and network gear.

More details are available on the donation website: RaspberryPanthers

Please consider helping by donating. Thank You!


ReportCardPS – Use PowerShell to create VMware Clarity Reports

Finally! I’ve updated the ReportCardPS module to be more user friendly. I had some free time while attending the PowerShell and Devops Summit this past week. This module creates ‘Card’ based reports in HTML, using the VMware Clarity HTML/JavaScript library.ReportCardPS_dark

ReportCardPS

I think I need to add some text the the icon above…

In order to separate ‘form and function’ I have create a second module to address the VMware Clarity piece. This way you could plug in any HTML/JavaScript solution to ReportCardPS. But I’m kinda biased with VMware Clarity….

ClarityPS

For the most part, unless you are building customized reports, you can forget about ClarityPS. Just know it exists, and that I still have quite a few more elements to expose to the PowerShell functions.

To get started, install ReportCardPS (This will auto-install Clarity PS:

Install-Module ReportCardPS

Review the available commands:

Get-Command -Module ReportCardPS

Get-ReportCardTemplateSet – This function can check directories for Json Files that can be used as a report template.

New-ReportCard – Ingests a JSON file and loops through the data to create the Cards within the report

If you run ‘Get-ReportCardTemplateSet’ with no parameters, it will return the default template files included with the module.

 
Get-ReportCardTemplateSet 

The current template file is named ‘vCenterHomeReport.json’ and provides the HTML file above. It’s as close as I could get to the vCenter Home page.

Here is a Link to the JSON file used to create the report

When you are ready, Connect to your vCenter:
 
Connect-VIServer 192.168.2.220 -User administrator -Password VMware1!

Then you are ready to run your first report. Keep in mind this is still a new module, and there are no current output options. Please feel free to submit a request!

 
New-ReportCard -Title MyFirstReportCard -JsonFilePath "C:\Program Files\WindowsPowerShell\Modules\ReportCardPS\0.0.8\lib\VMware\vCenterHomeReport.json" | Out-File C:\temp\reportcardps\test.html -Encoding ascii

There you have it! Oh, it also comes with a built in theme switcher! If you like that kinda thing….ReportCardPS_light

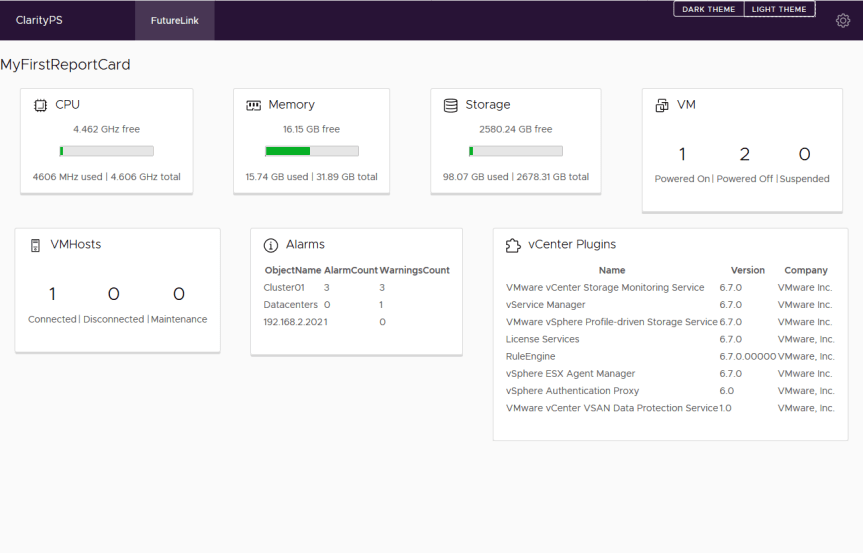
All docs are updated for both modules. Enjoy!

ReportCardPS

ClarityPS

Use PowerShell to create a GitHub Issue(s)

I was a bit surprised that I could not find some existing code that to do this (Google Fail?). Luckily I was able to find enough resources to solve this fairly quickly. If you know of another resource please let me know and I will add a link.

Here is my scenario for this code:

I’m working on an existing project with a few other guys, and we’ve just identified a large list of items that need to have issues created. I find it easier to break my work down in a bulleted list of tasks/features, then create issues. The problem is that using GitHub to create a list of issues(say 30-40) is a major time hog! So I wrote some PowerShell code to do the work for me! The goal is to create an Issue for a list of Tasks that each have a Title, Description(Body), and a label.

The most painful portion of this was the Authentication to GitHub, I wish more Enterprise vendors would support PowerShell, and provide examples! Be sure to update the Security Protocol:

[Net.ServicePointManager]::SecurityProtocol = [Net.SecurityProtocolType]::Tls12
Next, Create an API token from the GitHub API (see screen capture below).
  • Log into GitHub
  • Click on the drop down of your avatar in the Top right
    • Select ‘Settings’
    • Select ‘Developer settings’
    • Select ‘Personal Access Tokens’
    • Click ‘Generate New token’
      • Confirm your password
      • Type a Name
      • Add the Appropriate Permissions
      • Click the ‘Generate token’ button
      • Finally you can copy the new token (Save it in a secure location)
Capture

Great job so far!! Now lets setup some headers for the REST call.

$UserToken = "a60b16b5c8b3b268abd8b29fc774be1aacf67b91"
$Headers = @{
Authorization='token '+$UserToken
}


First, here is the function to actually create the data in GitHub:

New-GitHubIssue – Located under the Invoke-Automation repo tied to my GitHub account. Click the link to view the Function code:

Invoke-Automation/Powershell/GitHub/New-GitHubIssue.ps1

Next, a few lines to read a CSV and call the ‘New-GitHubIssue‘ function to create all the Issues.

Here is an example of the CSV(Fields: Title,Description,Label):

NewIssue01,FixThisBug,FancyLabelName
NewIssue02,FixThisBug,Component01
NewIssue03,FixThisBug,Web

Here is the loop to process the CSV:

[string]$Owner = "jpsider"
[string]$Repository = "Invoke-Automation"
$csvFile = "C:\Temp\NewIssues.csv"
$Content = Get-Content -Path $csvFile
foreach($line in $Content) {
$Title,$Description,$Label=$line.split(",")
Write-Output"Entering Issue - Title:$Title,Description:$description,Label:$Label"
New-GithubIssue-Title $Title-Description $Description-Label $Label-owner $Owner-    Repository $Repository-Headers $Headers
}

Boom, Done. 30-40 Issues created in less than 10 seconds. Give it a Shot! Add different fields that suit your needs.

Creating a local SSL certificate hierarchy with Windows PowerShell

Often times when playing with new technologies you are required to utilize SSL certificates and not everyone has access to and enterprise Certificate Authority. Here is how you can create one with Windows PowerShell on Windows 10.

Create a simple hierarchy of certificates.

  • Local Root Certificate Authority (CA)
    • This will be used to sign the Server and Client certificate.
  • Server Certificate
    • This will be used to bind the HTTPS service to the specified port.
  • Client Certificate
    • This will be used when you access the SSL service.

Keep in mind that the purpose of these certificates is to verify that the client and server certificates have been signed by the same Certificate Authority.

Create the Root Certificate Authority

To get started here is a command to create the CA:


$rootCAparams = @{
  DnsName = 'PowerShellDemo.io Root Cert'
  KeyLength = 2048
  KeyAlgorithm = 'RSA'
  HashAlgorithm = 'SHA256'
  KeyExportPolicy = 'Exportable'
  NotAfter = (Get-Date).AddYears(5)
  CertStoreLocation = 'Cert:\LocalMachine\My'
  KeyUsage = 'CertSign','CRLSign' #fixes invalid certificate error
}

Create and view the Certificate

$rootCA = New-SelfSignedCertificate @rootCAparams
$rootCA

PSParentPath: Microsoft.PowerShell.Security\Certificate::LocalMachine\My

  Thumbprint Subject
  ---------- -------
  8576D38B872A1C3E7AA363BDC1DA0300CF2E7E88 CN=PowerShellDemo.io Root Cert

Add/Import the new RootCA to the ‘Root’ Certificate Store

$CertStore = New-Object -TypeName `
  System.Security.Cryptography.X509Certificates.X509Store(
  [System.Security.Cryptography.X509Certificates.StoreName]::Root,
  'LocalMachine')
$CertStore.open('MaxAllowed')
$CertStore.add($rootCA)
$CertStore.close()

Now you can use the newly created RootCA to sign the Server and Client Certificate.

Creating the Server certificate:


$params = @{
  DnsName = 'Server.PowerShellDemo.io'
  Signer = $rootCA # &amp;amp;amp;amp;amp;lt;------ Notice the Signer is the newly created RootCA
  KeyLength = 2048
  KeyAlgorithm = 'RSA'
  HashAlgorithm = 'SHA256'
  KeyExportPolicy = 'Exportable'
  NotAfter = (Get-Date).AddYears(2)
  CertStoreLocation = 'Cert:\LocalMachine\My'
}

$ServerCert = New-SelfSignedCertificate @params
$ServerCert

PSParentPath: Microsoft.PowerShell.Security\Certificate::LocalMachine\My

  Thumbprint Subject
  ---------- -------
  F17FD4BC4D14EF9E2CBE6A55A2D855D830FE23D0 CN=Server.PowerShellDemo.io

Creating the Client Certificate:


$params = @{
  DnsName = 'DemoClient.PowerShellDemo.io'
  FriendlyName = 'DemoClient'
  Signer = $rootCA # &amp;amp;amp;amp;lt;------ Notice the Signer is the newly created RootCA
  KeyLength = 2048
  KeyAlgorithm = 'RSA'
  HashAlgorithm = 'SHA256'
  KeyExportPolicy = 'Exportable'
  NotAfter = (Get-Date).AddYears(2)
  CertStoreLocation = 'Cert:\LocalMachine\My'
}
$ClientCert = New-SelfSignedCertificate @params
$ClientCert

PSParentPath: Microsoft.PowerShell.Security\Certificate::LocalMachine\My

  Thumbprint Subject
  ---------- -------
  B2B3497FE918666C5CCB7AEE178C8134D61E8F95 CN=DemoClient.PowerShellDemo.io

Doing ‘Stuff’ with Certificates

To view the newly created certificates use ‘Get-ChildItem’ on the Certificate Store path.


Get-ChildItem -Path Cert:\LocalMachine\My\

PSParentPath: Microsoft.PowerShell.Security\Certificate::LocalMachine\My

  Thumbprint Subject
  ---------- -------
  F17FD4BC4D14EF9E2CBE6A55A2D855D830FE23D0 CN=Server.PowerShellDemo.io
  B2B3497FE918666C5CCB7AEE178C8134D61E8F95 CN=DemoClient.PowerShellDemo.io
  8576D38B872A1C3E7AA363BDC1DA0300CF2E7E88 CN=PowerShellDemo.io Root Cert

Also be sure to validate that the RootCA is listed in the Root Certificate store:


Get-ChildItem -Path Cert:\LocalMachine\Root\

  PSParentPath: Microsoft.PowerShell.Security\Certificate::LocalMachine\Root

  Thumbprint Subject
  ---------- -------
  CDD4EEAE6000AC7F40C3802C171E30148030C072 CN=Microsoft Root Certificate Auth...
  BE36A4562FB2EE05DBB3D32323ADF445084ED656 CN=Thawte Timestamping CA, OU=Thaw...
  A43489159A520F0D93D032CCAF37E7FE20A8B419 CN=Microsoft Root Authority, OU=Mi...
  92B46C76E13054E104F230517E6E504D43AB10B5 CN=Symantec Enterprise Mobile Root...
  8F43288AD272F3103B6FB1428485EA3014C0BCFE CN=Microsoft Root Certificate Auth...
  8576D38B872A1C3E7AA363BDC1DA0300CF2E7E88 CN=PowerShellDemo.io Root Cert
  7F88CD7223F3C813818C994614A89C99FA3B5247 CN=Microsoft Authenticode(tm) Root...

# This list was cropped, expect to see additional entries.

Using Certificates as PowerShell variables/objects

To set a certificate to a variable run the following command specifying which Common Name (CN) you want, and you can specify properties of the object, such as the Thumbprint:


$ServerCert = Get-ChildItem -Path Cert:\LocalMachine\My\ |
Where-Object { $_.Subject -eq 'CN=Server.PowerShellDemo.io'}

$ServerThumbprint = $ServerCert.Thumbprint

That’s it! You now have a simple Certificate Hierarchy with a RootCA, Server and Client certificate to use in a lab!

VMworld 2018 is around the Corner

I’m always excited this time of year. We are just a few weeks away from the best Technology conference of the year! I get to see quite a few familiar faces and the community is always a very positive one.

This year I am presenting two VMware {Code} Sessions and one vBrownBag community session.

You can view them in the Content Catalog (Search for Sider) and add them as a place holder on your schedule.

PowerCLI Lint [CODE5540U] – This session will focus on writing better code, and what tools are available to help you during this process.

PowerRestCLI, A community PowerShell Module [CODE5550U] – This session is all about using the RESTful API’s with PowerShell. This is really focused on learning new things while playing with PowerShell.

Getting Started with GitHub for PowerCLI users [VMTN5605U] – This session is focused on trying to explain GitHub to new users. I will do my best to relate the terms and tools to everyone.

Lastly I am super excited to attend the ‘VMware {code} Hackathon [CODEHACK]‘ for the third straight year. It’s always a great time with great people!

If its possible, please see if you can get your company to sponsor #vGolf.

See you at VMworld! #SiderHouseRules

The PowerShell Conference Book

Hey Everyone! It’s been quite some time since I last posted on my blog. I’ve been very busy with work and extra curricular activities. One of the projects I worked on was The PowerShell Conference Book. It was a terrific experience, I am very thankful to be included. By purchasing a copy of this book, you not only get the opportunity to immerse yourself into nearly 30 different PowerShell topics, you also get to support the OnRamp scholarship program!

My chapter is titled ‘Building Secure RESTful Endpoints with PowerShell’ and is focused on my PowerShell Module RestPS, which is available in the PowerShell Gallery.

Huge thanks to Mike Robbins, Jeff Hicks, and Micheal T. Lombardi for their work in organizing and delivering this project!

Pick up your copy today!

hero

Write-LogLevel – PowerLumber – PowerShell Logging Module

Are you a lumberJack?

Ever have difficulty implementing logging for long running or large scripts? Did they take up too much space because you either log EVERYTHING, or nothing? Or did you leave the logging you were doing while writing and troubleshooting your script, in the real script, and now you are creating too much noise? I was constantly changing my logging, adding, removing, commenting things out, then back in, etc. It was a mess, not consistent and a pain in the…… Not anymore! I’ve added a new function to the PowerLumber Module ‘Write-LogLevel’ that can increase or decrease the noise based on how the messages are defined in the script/module/function. This is just like Log4j that Java uses, although my implementation is a little different.

The PowerLumber Module is available in the PowerShell Gallery, and the source code is github.


Install-Module -Name PowerLumber

Import-Module -Name PowerLumber

Using the module you define each message with an option from ‘-MsgLevel’. The Options are currently:

TRACE,DEBUG,INFO,WARN,ERROR,FATAL,CONSOLEONLY

At runtime you define ‘-RunLogLevel’, based on the relationship between the options the message will get printed to the console, written to the log file, or both. The Options are currently:

ALL,TRACE,DEBUG,INFO,WARN,ERROR,FATAL,CONSOLEONLY,OFF

You can turn all logging off (‘-RunLogLevel OFF‘), and only output to the console(‘-RunLogLevel CONSOLEONLY‘), which is great for active debugging, without having to edit all of your log commands! If you are using a loop you also have the option of pulling in the -RunLogLevel from a property file so that you can edit the noise level on the fly.

Check out my example script, the console output versus the log output to see what I’m talking about. Sorry, its a bit redundant, but I wanted to make a point. Below we run the internal function 3 times, generating quite a few “messages” and a lot of console noise, but not all message are written to file…..

Write-Warning "Setting the RunLogLevel Variable controls the level of logs written to the logfile."
Write-Warning "All Message will print to the console unless 'OFF' is specified."
$script:RunLogLevel = "ERROR"
$logfile = "c:\temp\testing.log"
$Msg1 = "This is a TRACE Message"
$Msg2 = "This is a DEBUG Message"
$Msg3 = "This is a INFO Message"
$Msg4 = "This is a WARN Message"
$Msg5 = "This is a ERROR Message"
$Msg6 = "This is a FATAL Message"
$Msg7 = "This is a CONSOLEONLY Message"
$Msg8 = "This message has a hardcoded value for -RunLogLevel of ALL"

Write-Warning "You could force a message to appear, by specifying all as the -RunLogLevel"
Write-LogLevel -Message $Msg8 -Logfile $logfile -RunLogLevel ALL -MsgLevel TRACE

function Invoke-DemoLogLevel {
    Write-Warning "See which items write to the log file as you change -RunLogLevel"
    Write-LogLevel -Message $Msg1 -Logfile $logfile -RunLogLevel $script:RunLogLevel -MsgLevel TRACE
    Write-LogLevel -Message $Msg2 -Logfile $logfile -RunLogLevel $script:RunLogLevel -MsgLevel DEBUG
    Write-LogLevel -Message $Msg3 -Logfile $logfile -RunLogLevel $script:RunLogLevel -MsgLevel INFO
    Write-LogLevel -Message $Msg4 -Logfile $logfile -RunLogLevel $script:RunLogLevel -MsgLevel WARN
    Write-LogLevel -Message $Msg5 -Logfile $logfile -RunLogLevel $script:RunLogLevel -MsgLevel ERROR
    Write-LogLevel -Message $Msg6 -Logfile $logfile -RunLogLevel $script:RunLogLevel -MsgLevel FATAL
    Write-LogLevel -Message $Msg7 -Logfile $logfile -RunLogLevel $script:RunLogLevel -MsgLevel CONSOLEONLY
}
Invoke-DemoLogLevel
$script:RunLogLevel = "WARN"
write-Warning "You could force a message to appear, by specifying all as the -RunLogLevel"
Write-LogLevel -Message $Msg8 -Logfile $logfile -RunLogLevel ALL -MsgLevel TRACE
Invoke-DemoLogLevel
$script:RunLogLevel = "FATAL"
write-Warning "You could force a message to appear, by specifying all as the -RunLogLevel"
Write-LogLevel -Message $Msg8 -Logfile $logfile -RunLogLevel ALL -MsgLevel TRACE
Invoke-DemoLogLevel
 So keep in mind this is just a sample to show you what it can do, its kinda messy and a very stupid script. Here is what the console looks like:
PowerLumber
BUT WAIT! There’s LESS, YES LESS in the log file! Check out what actually got written to file:
PowerLumberLog
It’s very clear that this function can clean up your logs, when you choose.

I’m open to feedback, I’m not sure I’m sold on the parameter names yet, but I love the functionality!